In the last article I talked about some theory of how data types are stored in binary. Of particular importance were the concepts of endianness which defines the order of the bytes that make up a data type. This article will use XVI32 to practice determining and changing the values of data entries which make use of some of the data types we discussed in the last article.

Determining Data Values

I’ve put together a small sample file for this article, before continuing you’ll need to download it and open it in XVI32.

Download here

Once you have the file open in XVI32 you should see the hex and text values in the above screenshot.

To make this article more straightforward I’m going to tell you the actual structure of this file:

Remember that there are 8 bits to a byte, so get the number of bytes in a 32 bit integer you divide 32 by 8 and get 4.

In this part of the practical, you need to answer four questions:

  1. What is the decimal (base 10) value of the byte at offset 0?
  2. What is the decimal (base 10) value of the little-endian int16 at offset 1?
  3. What is the decimal (base 10) value of the big-endian int32 at offset 3?
  4. What is the decimal (base 10) value of the little-endian int32 at offset 7?

Tips for the struggling

If you struggle with question 1, reread part 2.

If you struggle with questions 2 or 4, reread part 4.

If you struggle with question 3, remember that the conversion is the same as for little-endian numbers only you don’t need to bother with reversing the order of the bytes.

Answers

The answers can be found here. If you didn’t get the same answer, check out the tips above.

Changing Data Values

Before starting this section, you need to make sure you’ve completed the questions above and got the correct answers to every question.

In this section, we want to change the values of the data entries encoded in this sample file. If you want to refresh your memory of making hex edits with XVI32, reread part 3 now. Remember to use overwrite mode in XVI32 rather than insert.

Again we have four exercises:

  1. Change the value of the byte to 54 (expressed as a decimal integer)
  2. Change the value of the little-endian int16 to 40 (expressed as a decimal integer)
  3. Change the value of the big-endian int32 to EDA0 (expressed as a hexadecimal)
  4. Change the value of the little-endian int32 to 6767 (expressed as a decimal integer)

If you struggle with any of these questions, the best idea is to reread the previous articles.

Answers

The answers can be found here. Open this file in XVI32 to compare against your own edits.

In this article you’ve determined the values of different data types and also changed those values. The skill you’ve just picked up means that you’re now able to hex edit a large range of data and files. Being able to determine the value of and edit data which occupies more than one byte is the most core practical skill in hex editing and reverse engineering binary files.

A Brief Intro

The last post gave a practical example of hex editing. In the post before that I talked about bytes and hexadecimal numbers. This post continues that discussion of theory.

With regard to hexadecimal numbers, its important to note that you don’t need to be able to convert between hexadecimal and decimal in your head, or even on paper, using a calculator for the conversion is fine. All that’s important is to know that the same number can be written both as a decimal and as a hexadecimal. For example if I had a byte in my file which has the value AB, as a decimal this is 171. You may sometimes see numbers prefixed with 0x like 0xAB, this is simply standard notation for a hexadecimal number.

While being able to store a value up to 255 in a byte is useful, being able to store larger numbers is more useful. In this post, I shall discuss some basic types.

Signed and Unsigned Numbers

In mathematics, numbers can be either positive or negative. In computing, sometimes we’ll want numbers that can be either positive or negative, or sometimes we know that a number will always only ever be positive. Why differentiate the two you might ask? Storing whether a number is positive or negative takes up a small amount of data (specifically one bit). If all numbers were treated this way, we would be able to hold a smaller range of data even if we knew that data would never be negative, which while a small limitation is still wasteful.

Signed numbers are numbers which can be considered to have a positive/negative sign information. Supporting negative  numbers comes at the expense of a smaller range of numbers that can be represented.

Unsigned numbers are numbers which must be of the same sign (typically positive). These numbers can support a larger range but at the cost of not being able to store both positive and negative values.

Integers

Integers are one of the most basic and ubiquitous data types in computing. They represent whole numbers such as 1, 5, 98 and cannot store fractional numbers such as 0.24, 1.7, 5.5. Integers can be signed or unsigned and come in various sizes. The most common sizes of ints are 16 bit, 32 bit and 64 bit. The number of bits refers to the size that the integer occupies, there are 8 bits to a byte and therefore a 16 bit integer is 2 bytes and a 32 bit integer is 4 bytes. By combining bytes together we extend the range of the data type significantly, the more bytes there are the more variations that can be stored. In the table below I show the range of the above three types of ints as both signed and unsigned numbers.

Little/Big Endian

When it came to writing say the number 123 as a hexadecimal byte, it was quite straight forward. We just worked out it was 7B using the calculator and that was it. If we now take the number 1234 which is bigger than the maximum value a byte can hold (255), we clearly now need to use an integer. So lets take a 32 bit integer which consists of four bytes. So if you put 1234 into your calculator and convert to hex you’ll get the result 4D2. If we stick some zeroes in front of it to occupy four bytes we would then get 00 00 04 D2. That’s great and this is a viable way of writing an integer however its not the only way.

Big endian means that the high numbers come first and the low numbers come last. For example with 1234, it’s quite a small number compared to what a 32 bit int can hold so its on the right side. Larger numbers would occupy further numbers towards the left.

Little endian numbers reverse the byte ordering so that the above example would be written as D2 04 00 00.

Its common for x86 architecture (PC) files and Intel Macs to be little endian and for PowerPC Macs and UNIX to use big endian. Particular file formats may choose to use little or big endian regardless of the architecture and operating system, however as a starting point I would assume the endianess matches the architecture.

In the case of Dune 2000 and most PC formats, files are stored in little endian. If you would like to read more about endianess try here.

Converting from decimal to a little endian 32 bit integer

  1. Convert to hex using calculator
  2. Prefix with ‘0’s until the number is represented as 4 bytes. (Has the structure 00 00 00 00).
  3. Reverse the bytes, each grouping is a byte. So 12 34 56 AB becomes AB 56 34 12

Converting from a little endian 32 bit integer to decimal

  1. Reverse the bytes, so AB 56 34 12 becomes 12 34 56 AB
  2. Convert to decimal using calculator

Bit Representations in Bytes

A byte is made up of 8 bits. Each bit holds a 1 or 0 value, so a byte that holds the value zero can be represented as 00000000. The value that each digit represents doubles from right to left, starting at 1.
Adding across we have zero lots of each number, so a byte with the bit representation 00000000 = 0
If we take a byte who’s bits have a value of 11111111 and use the above grid, we get:
Adding across we get 128 + 64 + 32 + 16 + 8 + 4 + 2 + 1

Which if we add it up, we find that a byte with a bit representation of 11111111 is 255 – the max value of a byte. The number of bits is the reason for the number of variations a number can hold. Try continuing the table across to represent 16 bits rather than 8 bits, add up all the top row numbers and compare against the integer data type table above.

Let’s take another example:

A byte with bit representation 00110010

Adding across again we get 32 + 16 + 2 = 50

Bit Fields

While the above usage of bits in a byte is the most common, it can be considered just one possible interpretation of the bits in the byte. Data only has meaning when we give it meaning. For example we could say rather than the right most bit representing the value 1, it could mean whether or not a tank can move onto a terrain tile. We could then say that the second to right byte which represents the value 2 can mean whether a player can build structures on this terrain tile. This usage of the bits in a byte is called a bit field. While bit fields are decreasing in usage now that data limits are getting higher and higher, they still have importance in many areas where small data sizes are critical.

Sub-byte data types

On a related note, you may want to hold more data than a simple true/false but want to use less data than a full byte. If say your maximum value was 15, then you’d only need 4 bits. You could then hold two different 4 bit variables in a single byte, one after the other. Alternatively, if you needed to hold a number with a ranger larger than a byte but smaller than 2 bytes, say a 12 bit number and you also wanted to hold a 4 bit number, you could combine the two by making use of 2 bytes. The first number occupying the first byte and the first half of the second byte, while the second number occupies the second half of the second byte. The below table shows the first number in red and the second number in green.

What’s next?

This post has been quite heavy in theory, in the next post I will explore data types through practical examples. So if you felt this was a lot to take in, don’t worry there will be opportunity to practice what I’ve talked about here and hopefully make sure you get your head around it.

In the last post I discussed why hex editors are useful for working with binary files. I also talked about XVI32 my free hex editor of choice. During this series I will be using XVI32 for examples, so if you are not on a Windows machine or if you want to use a different hex editor then you will need to adapt my examples.

So if you haven’t done so already, download XVI32. XVI32 doesn’t need installing, you can just unzip it and run it from there but you may want to copy it to a more memorable location and set up any relevant shortcuts.

In this post I’ll be taking more of a practical approach, I’ll start by talking about file signatures and then we’ll open up a few common file formats and take a look inside.

File Signatures

An extension does not make a type.

Or to put it more clearly, just because a file has the extension .png doesn’t mean there’s actually a png image inside. This is a very important lesson, since it is incredibly common for games just to give a common file format a different extension. When I was browsing the Call of Duty 4 files I realised instantly when I opened a file format up in a hex editor that it was just a zip with a different extension, meaning I could unzip it and see the files inside.

So how did I realise it was a zip at a glance? What kind of technomagery is this? Many files have a signature at the very start saying what format they’re in. It doesn’t matter what the file is called or what extension it has, if it has a signature then you have a way of identifying the file type. These are often called magic numbers because a piece of text can be represented as a sufficiently long number. In fact, any and all data can be considered just a very, very long number, but I may be straying off the point.

There are a number of very common file signatures you’ll see, including:

Signature Hex Type
MZ Executeable code (.exe)
PK 50 4B 03 04 Compressed Zip (.zip)
Rar! Compressed Rar
BM Bitmap Image (.bmp)
FF D8 FF E0 ** ** 4A 4649 46 00 JPEG Image (.jpg, .jpeg)
%PDF 25 50 44 46 PDF Document (.pdf)
‰PNG PNG Image (.png)
OggS Ogg Vorbis Media e.g. audio, video (.ogg)

For a more extensive list of file signatures check this page out.

Some Examples

Before continuing there are three examples you need to download, in the case of the images you will need to right click the link and hit “save as” or the equivalent option on your browser.

Example 1
Example 2
Example 3

Now for each of the examples, I want you to open it up in XVI32 and have a look inside.

Example 1

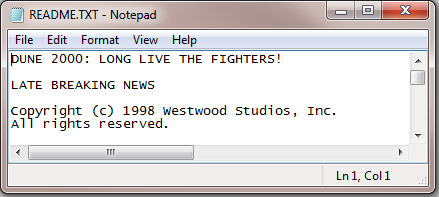
Once we open the first example in XVI32 we see that the file header starts with the per mil symbol followed by PNG in the text view. This file clearly is a PNG image.

Example 2

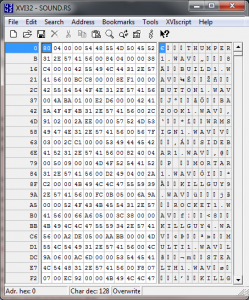
With example two, we see that the file signature is PK (named after the format’s author Phil Katz, but I often translate PK as Packed). This file is a zip as we can see in the table of signatures above.

Example 3

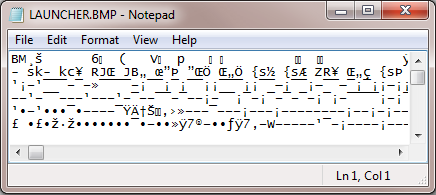
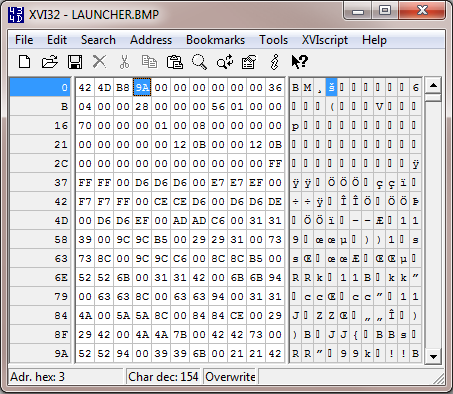
The final example has the file signature BM and is therefore a bitmap image. Ignore the F, that byte is actually part of a variable in the bitmap format that says how big the file is.

Example 3 In Depth

Let’s take a deeper look at the third example now that you’ve got it open. We know that the file is a bitmap image, so let’s take a look at it in Windows Photo Viewer. It’s a small image so you’ll have to zoom in.

If we open up the file in Paint, view it in Explorer or open its properties we’ll see the file is a 2 by 2 pixel image. I’ve created this small image to demonstrate the format more simply.

File Headers

In addition to the file signature, most files have a file header which includes some basic information about the file. In the case of an image this may include its dimensions and colour depth/quality. In the case of audio this may be the duration, number of channels and bit rate.

In the above image I’ve highlighted the file’s header. In the case of a Windows Bitmap the file header is 54 bytes long. To highlight a section in XVI32, select the first byte then select Edit -> Block <n> chars and type 54 in decimal mode.

You can see a couple of 02’s in the header, so a reasonable assumption would be one represents width and one represents height. We can also see an 0x18 which as a decimal is 24, so another reasonable assumption is that this is the colour depth specifying 24 bit colour. For now don’t worry about colour depth, I’ll talk about colour in a dedicated article later in this series.

After the header we have 16 bytes. Now we know there are four pixels (2×2) pixels in the image, so it’d be sensible to assume that those four pixels are represented in these 16 bytes.

Opening the file in Paint, we can use the dropper tool to pick the colour of each pixel. By going to edit colour, we can then see the colour in its red, green and blue components. You can do this manually, or use the figures I’ve shown below. I’ve also converted the values to hex for you.

Top Left

Decimal Hex
Red 34 22
Green 177 B1
Blue 76 4C

Top Right

Decimal Hex
Red 255 FF
Green 242 F2
Blue 0 00

Bottom Left

Decimal Hex
Red 255 FF
Green 127 7F
Blue 39 27

Bottom Right

Decimal Hex
Red 237 ED
Green 28 1C
Blue 36 24

Now using the hex values worked out for each colour, we can spot them in the file. We can spot each three, in reverse order displayed as Blue, Green then Red. The reason for this different ordering is something I’ll talk about in a later article. We can also see that the bottom left pixel is first, followed by the bottom right pixel, then followed by two 00 bytes. Immediately after is the top left pixel, followed by the top right pixel and two more null (00) bytes.

Ignore the two sets of two null bytes, these are due to a nuance of a the bitmap format which means that it must pad the number of bytes representing a row of pixels to a multiple of 4 (so in this case we have 6 bytes representing a row, so it adds on 2 blank bytes to reach a total of 8 bytes and therefore a multiple of 4).

Editing Data

So now that we know where the colour data is in the file, let’s try changing it.

Let’s pick the top right pixel, which is yellow. Let’s change it to blue. Right now its represented as 00 F2 FF, so since this is in Blue Green Red order rather than Red Green Blue, changing the value to FF 00 00 will be a strong blue. To edit the values select the first byte in the “00 F2 FF” sequence and make sure that it says Overwrite in the status bar. If it says Insert then tap the insert key once. The insert key toggles between Overwrite and Insert modes. Now simply type FF 00 00 on your keyboard and hit save.

Opening the file up in Windows Photo Viewer and zooming in, we now see that the top right pixel is blue.

Congratulations, you have made your first successful and practical edit in a hex editor!

In this article, I’ve talked briefly about how to identify common file types regardless of their file extension. I’ve also shown some basic hex editing in a practical example – editing a bitmap image. In the next example I’m going to go into data types which combine multiple bytes to represent larger numbers.

Before I start this article, I need to define a couple of terms:

  1. Byte – This is a data type which can store 256 discrete variations. Typically its said to have a minimum value of 0 and a maximum value of 255 (thus 256 variations including the 0). All files can be considered to just be a series of bytes.
  2. Hex or Hexadecimal – Unlike a decimal or base 10 number which only allows 10 different variations per digit and must include a another digit to include numbers which exceed that range (e.g. 8, 9, 10, 11 / 98, 99, 100, 101) a hexadecimal number stores 16 variations. After 9, the first six letters of the alphabet are used (e.g. 8, 9, A, B, C, D, E, F, 10 , 11 / FE, FF, 100, 101) .

All files are divided into two categories – plain text and binary.

Plain text files as the name suggests just contains text. They cannot contain images, sound, video or any form of text styling unless they mark it up. Examples of these files include .txt, .ini, .csv, .html, .php. These files can be opened in your system’s default plain text editor such as Notepad on Windows and will load and display fine.

Plain text files load and display fine in plain text editors

Binary files however can store a much wider range of data. Your camera photos, mp3s and videos are all binary files. Rather than limit the data storage to just text, binary files can make use of a larger range of encoding which means that we can’t view these files properly in a plain text editor. This is shown in the image below, in which I’ve tried to load a bitmap image into Notepad.

By contrast, loading a binary file in a plain text editor is not a good idea

So to view and edit binary files, we clearly need a different tool. If we know the file format then we could load the file into the relevant editor, loading images into Photoshop or Paint for example. But this is no good to us if we don’t know the file format, if there isn’t a relevant editor yet or if we want to examine the internal data structure.

Hex Editors can display and edit binary data in a very helpful and effective way. They are not limited to text characters and can be used to display and edit the full range of variations in each byte. Unlike text editors which display binary data badly and don’t support changing the value of non text data, hex editors are not hindered by these problems.

XVI32 is a freeware hex editor for Windows

My personal favourite free hex editor is XVI32 which can be downloaded for free on Windows. It’s quite a lightweight and functional hex editor and while there are many hex editors out there offering a greater range of features, I like the simplicity and straightforwardness of XVI32.

In the above screen shot we can see three columns. The left and thin column is the line number displayed in hex. The number shown represents the index or offset of the first entry on that line, for example B means 11 as a decimal and if you count across the boxes in either of the other two columns you’ll see that they are also 11 boxes across. These line groupings do not exist in the actual file, this is merely just how its displayed in the editor, a bit like word wrapping text.

The middle column displays the hexadecimal view of the file, while the right column shows a ASCII or text view of the file. Each box in the hex and text views represents a byte in the file.

So why is hex useful? Why not represent the values of each byte as a decimal?

Hexadecimal numbers have the useful property that with two digits they can represent 256 discrete variations, just like a byte. So rather than use 3 digits to represent the value of each byte, we can use two digits to their full range. The minimum hex value for a byte is 0 (or 00) and the maximum hex value for a byte is FF.

To convert between decimal and hexadecimal you can use the built in calculator on Windows (or use a site like this). Depending on your version of Windows you may need to change to either scientific or programmer mode before the hex and decimal options are available. To convert a number, type it into one mode then select the other mode. For example:

In the next post, I’ll explore how to use a hex editor and look at some common data types. Before reading that post however, it would be useful to try opening a few different file types in a hex editor just to get a feel for it. It would also be very helpful to try converting a few different numbers between hex and dec.

This is the first in a series of mini articles on reverse engineering binary files, particularly those in computer games but the majority of what I will discuss has applications in all areas of computer software. While I may touch on reverse engineering executable code, memory hacking and plain text formats, the majority of the focus is on actual binary files.

Since 2009 I’ve been reverse engineering and modifying the classic Westwood RTS Dune 2000. Despite being released in 1998, the modding community was held back by a limited number of tools. For example while it was possible to edit and make new multiplayer maps for the game, it was not possible to make campaign maps and missions. A couple of guys had been exploring the mission files and had made small, but significant, discoveries. This was when I joined the modding scene and since then I’ve reverse engineered a whole range of different files in the game and released a bunch of tools based on my research.

When I started, I had no reverse engineering experience. I’d never used a hex editor and had no idea about the binary representation of data. If you’re in the same boat, then don’t worry, in this series of articles I’m going to talk about what I’ve learned in terms of both conceptual theory and also practical techniques that I employ. This series of articles is particularly aimed at computer programmers with no reverse engineering experience and who would like to get started.

As with programming, the initiative is all on you. You will apply the theory and techniques to a different set of problems and formats than I did. As such you will need to extend and modify them to fit your needs and make a few leaps on your own to successfully reverse engineer a complex format. But if you start off small and work your way up, once you understand the basic theory you’ll find reverse engineering is actually very straight forward.