Introduction

Back in July, I got an email from Simon at Four Door Lemon confirming that I’d be working on porting QuizQuizQuiz, an established iPhone quiz game, to Windows Phone 7. At the time a platform that had yet to be finalised and released to consumers. The iPhone game features over 36,000 questions for a range of languages and locales. It supports both single player game modes and also multiplayer with up to 5 players, perhaps the strongest selling point of the game however is how it’s quiz engine has been built, catering the experience so that the user sees suitable difficulty questions and avoids repeating the same categories and questions. With Windows Phone 7 to be released within a few months, it seemed like a logical option to port QuizQuizQuiz to the platform and target the game as a launch title for WP7.

While I had plenty of experience developing in C# and XNA, porting the game to Windows Phone 7 was an interesting experience requiring me to think about structuring for a platform I’d never encountered before. There was plenty to learn from the experience.

What went wrong?

Dynamic allocation on an embedded system

One of the advantages of using XNA is how easy it is to deploy to other types of platforms, while the game was targeting WP7, two clicks and I had a project ready to deploy to PC. The code needed to support full use on PC ran at just 8 lines. While testing on both the PC and the emulator, load times were rather minimal, a couple of seconds. It wasn’t until we received a device from Microsoft however, that I noticed how hefty the load times were. At the time I was concentrating on getting the game working fully, so load times weren’t my main concern. A few weeks later and I tracked down the issue to our question loading.

With 36,000 questions, compressing them made sense to keep the installation size down. Porting the decompression algorithm from C++ to C# directly on a line by line basis wasn’t possible, I’d written my own C# implementation from scratch. Taking a look at it again and I saw the magic word “List” at the top. Oh dear, it was having to reallocate over and over again as the file decompressed. As the Italian captain says in ‘Allo ‘Allo – “What a mistake-a to make-a!” Since we already knew how big the decompressed file would be I replaced the list with a fixed length array, allocated it once (combined with a couple of other minor optimisations) and the result – an 18x faster decompression time!

Version PC WP7 Device
Original Algorithm 300 ms 9700 ms
Optimised Algorithm 50 ms 600 ms
600% faster 1800% faster

Tombstoning

During their usage of smartphones, users often need to stop what they’re doing in one app and use another, whether that’s checking a map, searching for bus times, or making a note of something they’ve just remembered. The first version of the Windows Phone 7 OS does not support multitasking, so this means that for the moment applications can’t be minimised to the background while another is active. Apparently, Microsoft is planning to implement multitasking in a future release. However, Microsoft present us with an alternative to having your game killed off, when the user needs to fire up a browser, called Tombstoning. The Windows Phone 7 OS uses a stack-like structure for open applications. If your game is top of the stack and the user hits start, the start application will open and an event will be triggered in your application, allowing you to save information in the background, before the OS forcibly terminates the application. When the user has finished searching and your application appears at the top of the stack again, it is reactivated. This gives you an opportunity to load your saved data and resume gameplay as though nothing had happened.

Tombstoning is something I ended up implementing in QuizQuizQuiz, towards the end. There’s a mixture of reasons for this, namely that I was having difficulty testing tombstoning on the emulator and didn’t have access to a device at the time and also I had prioritised other parts of code development. In hindsight, this wasn’t a good idea. As the user can effectively terminate your application at any time (with warning fortunately) and the need for gameplay to be able to be resumed from any point, it is important for tombstoning to be factored into the code structure and design early on. It’s both Microsoft’s advice and also something we felt important that the state of the game on termination and reactivation should be exactly the same, including things like temporary on screen messages. Implementing this retroactively, took a lot longer than I wanted and I feel that for any future WP7 applications I work on, I’ll factor in tombstoning right from the start.

Emulator and device differences

Despite hearing at presentations that the emulator emulates the device exactly, this was not my experience. While working on network support, which unfortunately didn’t end up making it into the QuizQuizQuiz release, I noticed several implementation differences, which initially confused me significantly. Additionally, after spending weeks testing and using QuizQuizQuiz builds on Windows and the WP7 emulator, I encountered an exception as soon as I attempted to load the game data files on the device. This turned out to be the usage of multiple serializable dictionary objects in one class and I believe relates to a difference in the XML serialization on the .NET Compact Framework. Oddly, this runs fine on the Windows Phone 7 emulator and it was a day or two until I tracked down the issue and could run the game on the device. If you haven’t used the .net Compact Framework before, you’ll notice less functionality and missing classes. While developing the decompression algorithm described earlier, I needed the BitVector32 class which is missing from the Compact framework. Fortunately help is at hand in the form of the Mono project, who have made available alternate implementations of classes with source code.

Underestimating scope

Before working on QuizQuizQuiz, I had no mobile development experience or experience with Objective-C, previously having only worked on Windows based games and tools. My initial estimation that it would only take a few weeks to port was therefore ambitious to say the least. The scope of the project was something I underestimated and the number of bug fixes required was something I also didn’t expect. After 6 weeks, the game was fully playable on our Windows Phone 7 device and was more or less finished after 8 weeks, besides the final testing and bug fixing. I feel that having learnt from the experience of porting QuizQuizQuiz, if I were to do it again I’d be able to shave a couple of weeks off that and improve the gameplay structure.

What went right?

Using EasyStorage

Nick Gravelyn, formerly a Microsoft MVP and now part of the XNA Framework Team, released a library back in 2009 that manages data storage across multiple platforms. The library allows you to save and load data from local storage by writing your storage interaction code once, rather than writing all the platform specific permutations. Nick has since updated EasyStorage to run on XNA 4.0 and Windows Phone 7.

The rationale for this may not be immediately apparent, since this game was targeting Windows Phone 7 only. Although I found using the Windows version of the build quicker to test on (especially when you’re doing something which requires iterative testing), as it didn’t require the time needed to deploy and start-up on an emulator or device, the main importance of building on a cross platform storage system was that it gave us the possibility of deploying the game to Windows PC and Xbox Live Arcade Indie Games for the future, without needing to rewrite code that interacted with the storage systems. The difficulty in using EasyStorage is comparable to building on top of the storage device provided by XNA, so I feel it was a good idea to leverage EasyStorage just in case.

Building our own GUI system

On previous projects that I’d worked on in XNA, I’d been involved in the development of XNA based GUI systems. This presented a number of challenging areas, particularly representing layouts on varying aspect ratios. I investigated the possibility of using an existing GUI system, in particular looking at those listed in the XNA Developer Survival Kit (which has now been superseeded for XNA 4 by XDSK2.)

However I decided, to achieve the intended interface controls it would be easier to roll my own GUI system. This went much more smoothly than I’d imagined, by defining a base GUI control class and some interfaces (user interaction for example), I found that it was very easy to create derived GUI controls and their functionality. Flagging a single control as active when the user interacted with it prevented the user from accidentally interacting with other controls and seems quite effective. While rolling your own GUI system could become very complex with advanced text rendering requirements, the basic system required and implemented for QuizQuizQuiz is something that I feel went right.

Using existing data files

The iOS version of QuizQuizQuiz already had a substantial amount of data, from complete localisation tables to quiz categories and thousands of questions. Leveraging the existing data files and formats used by data formats and files was therefore a good idea as it meant that the existing file authoring systems could be used, saving time and also that the loading code would be straightforward to implement, which ended up being more or less a direct port of the Lemon Engine based code to System.IO. This was quick to implement, but importantly also quick to run and propagate the data structures in the game at runtime.

Supporting the existing authoring tools has important implications as it means both the iOS and Windows Phone 7 versions of the game use the same file format. New content then only needs to be generated once and will work perfectly on both platforms, making it quick and easy to update multi-platform versions.

The hardware back button

Many touchscreen mobile devices also feature hardware buttons, previously I’d found the mixture of software and hardware buttons to be an irritation, particularly with using a touchscreen keyboard with a hardware backspace button. This was something which broke the flow of writing a message and slowed me down. Using the hardware back button on a Windows Phone 7 device however was something I very quickly got used to and appreciated.

I feel the stack-like navigation in WP7 is very effective and the usage of a hardware back button feels a lot more natural and logical to the touchscreen buttons employed on iOS. While it seems that I shouldn’t say usage of the hardware back button is something that went well, as supporting it is a technical requirement for publishing, I’m going to anyway! The presence and usage of a an ever present back button, speeds up day-to-day navigation on the phone and also helps standardise the user’s movement from screen to screen. It’s definitely a good idea to build your application or game flow and screen layouts with the hardware back button in mind.

Stats:

Software Used:
Microsoft Visual Studio 2010 Express for Windows Phone
Notepad++
Adobe Photoshop
TortoiseSVN

Platform: Windows Phone 7
Time in development: 8 weeks (280 hours)
Source Lines of Code: 5869
Development Machine:
Windows Vista 32 bit
Intel Core i7
6 GB RAM
NVIDIA GeForce GTX 260

Links:

“Dolly zoom” is a cinematography term for a method you’ll instantly recognise. Originally pioneered by Irmin Roberts, a Paramount Pictures cameraman, the method was made famous by its memorable use by Alfred Hitchcock for the film Vertigo. The cinema device has made numerous appearances since and is usually used for giving a sense of vertigo, unease or depicting the emotional impact of a realisation on a character. The basic premise is to keep the subject of the frame at the same scale while changing the scale of the background and/or foreground. This effect can be extremely good at giving a sense of vertigo and unreality.

Dolly zooming can be achieved by changing the field of view while changing the distance from the subject to ensure the subject remains approximately the same desired scale. When using an actual camera, this would be achieved by using a zoom lens (zoom lenses change the focal length and thus field of view) and at the same time physically moving backwards of forwards as appropriate.

Because of the non-linear relationship between the field of view and camera distance required to achieve this effect, it takes a good degree of experience and skill to do manually. In computer graphics, however we can use an equation to help us out. A common equation to achieve this effect is:

Now looking at the equation above, there are three variables. The field of view, which we can control and is therefore an input. The distance, which is calculated by the equation and is therefore the output. And finally, width which is a value relating to the target of our dolly zoom, this we will need to calculate ourselves. Fortunately this is straightforward as all we need do is multiply the target distance by the arctan of 90 degrees.

Assuming your camera view matrix is created using the standard Matrix.CreateLookAt() method, all you need adjust here is the camera eye position parameter. And assuming that the camera projection matrix is created using Matrix.CreatePerspectiveFieldOfView(), you can simply supply the field of view of the camera in radians.

Now, probably what you’re most interested in, the sample.

Please note, this is the first time I have attempted to implement the effect so if the implementation can be improved I’d be delighted to hear how.

References

http://en.wikipedia.org/wiki/Dolly_zoom
http://www.gamedev.net/community/forums/topic.asp?topic_id=528056
http://www.mediacollege.com/video/shots/dolly-zoom.html 

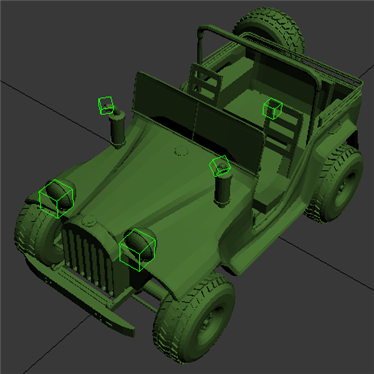
In the development of many computer games, it is often important and necessary to store positions and meta data relating to 3d models and scenes. For example, you may have a model of a car and wish to place a number of meta-points on the model. Such as a point on the exhaust for a smoke emitter, points on the front for the headlights to project from, an object attachment point for that roof mounted turret, local damage helpers and positions inside the car for players to sit and interact with the steering wheel, to name but a few implementations. Rockstar North for example use this system in GTA: San Andreas by setting up dummies in 3d models. An example can be viewed here of a car from the game.

A method to address such a need is in placing pre-identified (essentially meta) bones throughout the model. There are many names for creatable objects in graphics packages which will export to bones, 3ds max has dummies, Maya has locators and most other software packages call them nulls (such as Lightwave, Softimage, Houdini, Blender and Cinema4d), systems like Unreal Engine call them pawns. These bones are connected to no geometry, which means its very easy to access them from your bone tree but they won’t visibly be displayed (unless you want them to be) and so are ideal for representing invisible helper points.

Some key uses of meta bones include:

  • Object attachment points, e.g. customisable weapon hard-points on a spaceship, or an articulated trailer on the back of a truck.
  • Particle emitter locations
  • Spawn points
  • Lights
  • Waypoints
  • CTF Locations
  • Weapon Pickups
  • King of the hill zones
  • Anchor points

How to make them

These objects are very easy to create in most packages, for example in 3ds max simply go to the create tab, then the helper tab and click the “Dummy” button and create the object in one of your viewports. You can accomplish the same in Maya by creating a locator, in Lightwave by creating a dummy and most other graphics packages use the term “null”.

Now that you’ve created one of these object, you now need to encode information about its purpose and relevance, which can be parsed by your game. In this article I describe storing the data and identification by encoding it into the bone name, however in the “Taking it further” section I cover some options for extending the capabilities of this meta-data. Each object should have a name which can identify every piece of information it needs to communicate to the game, such as the type of meta-object it is and some related data. Also note that bone names must be unique, so you may need to include some sort of unique identification number. As an example, you could approach encoding a smoke emitter like so: <type>-<subType>-<uniqueId>-<size> such as “emitter-smoke-01-50”. Bear in mind that there will be a comparatively small limit on the length of the name.

Also remember that it can get confusing having a lot of these objects in a scene, so confusing object a that does x with object b that does y is a problem. You may consider picking different colours for different types of objects.

How to load them and display them

Once exported, your nulls (or equivalent) should now be stored as model bones. You can retrieve a list of the model’s bones by accessing the collection of ModelBones, for example: myModel.Bones. You will then have a list of bones which store the name and world matrix, which is great as you can retrieve the relevant meta-tags stored in the name and decompose the world matrix into its translation and scale vector3s and a quaternion for rotation (you can convert this to your conventional Euler angles (i.e. yaw, pitch, roll) by using skytigercube’s method in this article at Creators Club.) For example:

Vector3 scale, translation, eulerRotation;
Quaternion rotation;
bone.Decompose(out scale, out rotation, out translation);
eulerRotation = QuaternionToYawPitchRoll(rotation);

You may wish to parse the bones in the model when you load the model in and build up the data structures which will rely on the stored meta-data. A quick example, which just runs through bones each Draw call and displays a sphere at all bones that begin with “myNamedTag” follows:

foreach(ModelBone bone in model.Bones)
{
    if(bone.Name.StartsWith(“myNamedTag”)
    {
        spherePrimitive.Draw(bone, view, projection, Color.White);
    }
}

Here any bones that begin with “myNamedTag” such as “myNamedTag01”, “myNamedTag02” and “myNamedTag-Front” will have a sphere drawn using their bone world matrix. Note that this is using the sphere primitive class from the Primitives3D Creators Club sample and relies upon an already sphere primitive.

Taking It Further

Encoding meta-data into the name of bones works fine for fairly simple implementations, however if an object has a lot of information attached to it this becomes less than ideal to encode everything into the contents of a small text box. You may consider encoding all this data into each object’s user defined properties (in 3ds max, other software will have equivalents.)

In terms of displaying and loading user-defined-properties you can check out the creators club NormalMappingEffect sample (and I’m told the premium robot sample), while http://xnaengine.com/ and http://www.catalinzima.com/?page_id=66 appear to do something with 3ds max user-defined properties. There is also some discussion at:http://forums.xna.com/forums/t/13265.aspx?PageIndex=2

You could also make a custom tool to achieve more customised functionality or extend your graphics package’s functionality by taking into account its support for plugins and scripting (if it has the support) and coding in what you need.

And Finally

I hope this article has been informative. Criticism and comments are appreciated. If people want me to put together a quick sample I’ll be happy to do so, just comment.

References

http://www.gamedev.net/community/forums/topic.asp?topic_id=279475
http://gamecareerguide.com/features/20010324/melax_03.htm
http://www.3dcognition.com/theoryGameDev.php
http://update.multiverse.net/wiki/index.php/Platform_Tutorial_Importing_Static_Models

Creation and use of placeholders, whether levels, 3d models, sprites or sounds, has a number of advantages when developing computer games. In this article I discuss some aspects of the use of placeholders in games.

Decouple programming and art schedules

Placeholders are an excellent way to support code development without waiting on asset completion. Using placeholder graphics decouples programming and art schedules, allowing them to progress independently of each other. By using quick and effective placeholders, the coders can get to work on what’s important without being held back waiting on final assets to be finished. The coders can then put in revised assets when they become available – just make sure you don’t leave any placeholders behind. An industry professional once told me how they “borrowed” some models from a very similar game to the one they were making at the time and accidentally shipped the demo with the hijacked assets!

Speed of build turnaround – Proof of concept

High poly models or detailed assets can take a long time to create and when you’re trying to prove the feasibility of a project you’re often more interested in the technical side. When trying to decide if what you might attempt is technically feasible in your environment and time constraints, you may find that when building a proof of concept you just want some quick assets to put in so that you can continue to focus on building up the code. In terms of pre-production, placeholder art can be very important just to get a working build. I was recently at the Microsoft X48 competition, where we coded a game in 7 and a half hours. When developing, our artist mercilessly took Google images and made graphics by tweaking them in Photoshop. Our focus here was not to make a pretty game, but to get a working build as fast as possible.

Identify the tolerances

Placeholders also are a great way to carry out tolerance testing when trying to work out how high poly you can make scenes for example. It would waste a lot of time for the artists to not know how detailed to make their 3d models and what limitations there are on the type of material properties they can use. By using placeholders that simulate the sort of poly counts and shaders that you want to support you can figure out the tolerances of your game engine, what you need to optimise and what the artists need to be limited to.

Issues with placeholders

While placeholders mean that you can get the basic look and feel of your target environment without the full development time, they can also work to your detriment. It can be demotivating to see your project littered with ugly placeholders. Most games go the extra mile in creating the fun factor by rewarding visuals and involving graphical finesse. Likewise placeholders can create issues for the team, the designers may not know how the physics of a vehicle may work when the vehicle has not yet gone beyond being implemented as a placeholder, which of course must be understood for a more balanced and smoother level.

Some examples in the context of level design

When Half Life 2 was being developed, the developers took a new approach. Separating art from design in the level creation, the designers would flesh out the gameplay before the team of artists made the levels look pretty. The initial stage in level production was to create an “orange map”, where the entire level’s textures were orange. The result of this meant that the team could test and perfect gameplay, script in any necessary elements and let the programmers work on what would become finalised levels without waiting for the art pipeline to be completed (or indeed necessitate the start of art development.) The result was a much more rapid and smoother development process, as designers involved in play-testing, tweaking and working out where those big, beasty enemies should jump out can do their work equally well in either a Sunny-D environment or a fancy multitextured and materialed environment.

In the context of level design for example, I discussed this with a friend who is a level designer using UE3. He stated that he believes using placeholders cuts development time in half. “With level design (my choice examples, as it is my area of knowledge) placeholders are easier to throw around. Gameplay isn’t fun? Put a block there to cut the view distance as opposed to putting a table there and finding out later that it is ineffective. If designers are too busy worrying about “But a table doesn’t make sense” then the actual fun will never be developed.”

So who makes it?

Depending on your development environment (and in the case of studios), you may have either the programmer developing the placeholders or the 3D artist. I know a few triple A studios where they won’t even let their programmers have 3ds max installed in case they start making placeholder graphics, leaving this task to be done by the 3d artists.However, depending on your environment this may not be feasible or desirable. Depending on the organisation, it may be the 3d artists or the programmer who creates the placeholder, this is more of a managerial decision and each has its pros and cons.

I hope this article has been an interesting read, as usual comments and criticism are appreciated. If you can suggest any improvements I can make, I’ll be happy to change the article.

References and Further Reading

Keighley, G. (2004). The Final Hours of Half-Life 2. Available: http://uk.gamespot.com/features/6112889/index.html. Last accessed 28 March 2010.

Recently I’ve been doing tools development, something I’ve done a lot of in the past when reverse engineering Dune 2000 (an old RTS.) I’ve learnt some interesting lessons in tools development, which I thought I’d share with you.

Understand your user

Firstly, the most important part of tools development is seeing how the end user will use it and making it as easy as possible for them. When developing a series of tools for our artists, I’d frequently speak to them, going through the work process and how they feel it should flow. Make sure the tools you develop are suited to the intended target.

Keep things straightforward

Everything should be kept straightforward, easy and quick (and obvious). Too many programs have massively complicated user interfaces which can be completely baffling. It’s worth spending time working on the design of the program and the structure whether that’s on paper or on a graphics package. The last tool I wrote I mocked up quickly in Photoshop what it would look like and drew the class structures on paper, before touching a line of code. This helps you think about how to make the program well structured and come across potential problems before they become an issue.

Make everything fluid

It’s important to make everything fluid, support dragging and dropping of files rather than forcing a rather more cumbersome process of being locked in to the windows open file dialog box. If your user is applying a texture to a shader for example, let them drag it straight in from Windows Explorer, it makes things quick and easy. Auto focus helps keep the flow going with tool usage, having to keep reselecting the same option because the program forgets gets frustrating quickly. In a similar fashion if you have a list of items in a menu, let them be dragged up and down rather than requiring a button to be pressed each time you want to move the item up one.

Keep clicking to a minimum

Following on from this idea, a good rule of thumb is to keep functionality down to as few clicks as possible, this way your end users will be able to work more productively. Shortcuts are also good at speeding things up, but should never be the exclusive way to carry out an action. Most modelling packages for example have many ways to achieve the same task. Less clicks is a fundamental improvement and goal for tools, people spend half their lives clicking through menu after menu. The objective of a good tool is to cut this down to a minimum.

Clean UI

Keep the user interface clean and clear of clutter. Icons can be very helpful, but what they represent need to be easily recognisable at a glance. Adopting common icon designs is definitely a great idea, using a floppy disk icon for saving and an open folder for opening a file for example. Everyone knows what they mean, resulting in a quicker learning curve.

Redesign and reiterate when necessary

When development of the tool becomes held back by poor or a changed design, it’s time to have a think, work out the optimal structure and recode the tool. Frequently I’ve wasted more time trying to make code work which is broken from poor design, than it would have taken me to change the structure and reimplement the code. I find an iterative approach to this development very helpful, the first design is rarely optimal and you’ll learn from each iteration.

Target your tool

I also believe in the Unix ethos of developing small targeted use applications as opposed to über programs which attempt to be a jack of all trades but result in being a master of none. My experience of the asset production pipeline is that dedicated tools which each accomplish a job is a much more favourable approach, for example creating a mesh in Lightwave, shipping it off to Zbrush to be sculpted, then taking it into Topogun to create a lower poly version, baking the high poly to normal maps, tweaking in Lightwave again, generating maps with XNormal, then exporting to FBX via 3ds max (Lightwave’s FBX exported is supposedly pants).

Flexible interfaces

This is more an issue of personal taste and indeed there are a lot of different systems out there for the way different parts of an application are presented. Recently I’ve gotten into using floating windows, if I want to bring up the properties of a mesh for example, I find it far more useful having that as a separate window. Windows can then be resized and moved about, your preview window can be maximized on a second monitor for example. Then the layout can be saved and preserved, allowing a lot of flexibility for the end user.

Allow extension

Make tools that are easily extendible, with readable and editable configuration files. Custom user configuration helps makes people life’s easier, having the capability to change their preferences to something they find more suitable. We don’t all like the same layouts or colours, so supporting user changes will make people’s time less painful.

Existing formats make life easier

Usage of existing and established file formats can be very useful. I like to use XML where appropriate (although I change the extension) as it makes serialization and deserialization very easy, tends to generate readable files and allows quick editing in a program like Notepad++ (or just Notepad). As a standardised system, it also means someone else can pick up your files and understand how they’re structured – which is certainly more involved with a custom or binary format. An alternative to XML is JSON, which provides a lightweight alternative that my friend swears by. It can also give a lot more flexibility when adhering to an established standard when storing other data, such as images and models.

While using established standards for storing any kind of data can be extremely helpful and effective, it does carry with it a potential inherent problem. By adhering to standards, you are limiting what you can do to what the standard supports. In the case of XML this may not be such an issue as its a very versatile markup language, however locking yourself in to an image or 3d model format can be extremely limiting. To get past this, you could extend or encapsulate the format or simply see if there is an alternative which is better suited.

Summary

To sum up, planning and design with an iterative approach allows for speedy development of tools. Keeping things extendible and configurable means the user can keep things the way they prefer, while constantly looking to streamline the flow of usage speeds up tool use and improves productivity.

Further Reading

Shawn Hargreaves on Tool Postmortem: Climax Brighton’s Supertools
Noor Khawaja on Making Your Game Tools Fast And Efficient
Dan Goodman on Game Tools Tune-Up: Optimize Your Pipeline Through Usability
Adams Greenwood-Ericksen, Eric Preisz, Shawn Stafford on Usability Breakthroughs: Four Techniques To Improve Your Game